Welcome Back!

I’m sorry to be away so long from my readers but I have been so busy with my family and career I had no time for cooking and writing!

It is one day before Diwali here in India and it’s buzzing like a bee. Its like Christmas and Fourth of July all in one! The crackers are slowly going off and by this time tomorrow it will be noisy waiting for the lights begin.

He only downside to the crackers is the pollution it creates and the safety of others in the city. They are loud here, more so than in USA.

So I am posting two recipes today Corncakes and a laddu that all cultures would enjoy!

LETS GET STARTED

My Indian Root Vegetable Soup

I really love root vegetables and I cannot bake them here and I’ve had them sauteed in a hundred ways. So, along with my love of root veggies my job as a mother trumps, and low and behold I love the most time consuming vegetables, like beetroot. Now, in my journey in India I have come up with a great recipe that I love which incorporates many Indian tastes in a delicious low broth soup for babies and children to eat!

Ingredients
5 medium carrots cut into triangles bite size
4 medium onions in bite size pieces
1 large turnip cut into bite size pieces
1 whole stalk of celery the whole thing leaves heart and all in bite size pieces
3 small bay leafs
1 tsp hing powder
1 tsp of turmeric powder
2 to 4 tsp of salt
1/4 tsp of black pepper
2 garlic cloves
2 tbs dry fresh parsley
4 tbs unsalted butter or olive oil
4 cups water

image

In a pan that is suitable for putting in a pressure cooker add everything but 4 tbs unsalted butter and 3 cups of water, let mixture soak for 30 minutes. add remaining water and 2 tbs of butter before putting it in a pressure cooker. pressure cook for 6 to 7 minutes after 1st whistle. Take out and remove most of water and set aside to freeze. gently mash the mixture a little adding butter and salt to taste. If I want more of a kick to the soup for my inlaws I add Guntur green chillies and Kovvur red chilli powder to their taste in cooker whith veggies.

Veggie Sauce to try with but not madatory as we eat with sauce or milk bread rusk with soup.

Frying, Drying and Making Tidbits From My Andhran Kitchen by Paradesi Bhaarya

Drying chillis in a mixture of buttermilk and corriander leaf fresh, lots of salt for several days in an earthen jar. Remove when white and put on trys in sun all day until dry. Store in a very dry place for up to 3 years if use silicon packets in container, just make sure it doesnt touch edibles. We use chillis from Guntur District in Andhra Pradesh and they are so delicious!

image

image

Fryums are a common addition to a meal to add toast texture to dals. First we prepare a thick paste and then take old saree material and lay out flat using rocks to hold down edges. Then, we spoon on dollops of paste to saree and let dry in sun. Remove at night and then lay out again next morning until completely sun dried, about 1 week. If cracking too much the paste was not thick enough.
Pastes can be made with anytuing from chickpea flour to rice flour. Many fvorites are potato flour and tapioca flour. You will want to take 1 liter of water and bring to a boil add ground green chillis, and 4 Tablespoons of whole cumin seed and 5 to 10 tablespoons of salt. Fryums are usually very salty, so salt to taste. Once boiling add flour of choice (rice, corn, jowar, millet or ragi, besan or potato flour) Bring mixture to a boil and watch it thicken. you want it to be thick like molassas but still runny. Finish by putting on saree and setting out in sun. Do not turn or mess with them. As you see below we have put a plastic cover over them that is transparent, we do this only to keep flys or dirt from landing on them, as India is very dusty.

image

image

To make Fryums we heat up 5 tbs oil for several minutes, then we place a few of them in oil and jiggle a little, once puffy flip and repeat. should only take 1 minute for them to fry up. Serve with dal and a vegetable curry! Enjoy!

South Indian Chicken Fry

chickenfry

2kgs of boneless chicken breast curry cut

1/2 kg of bone-in curry cut chicken pieces

15 curry leaves

1 bunch of coriander leaf chopped

1/4 tsp of turmeric

1 Tbs chili powder – to taste

1 tsp of coriander seed powder

1 Tbs of ginger garlic paste (I make mine fresh)

2-4 Tbs Salt- to taste

3-5 Tbs of sesame seed oil or peanut oil

In a bowl combine all ingredients except the curry leaves and the coriander leaf let sit 1 hour if you want a tender and deeper spice flavor..

Heat a deep frying pan with 4 Tbs oil on low. Once crackling add the chicken mixture in one layer in pan. Cover and cook until chicken is no longer pink 15mins or so, adding oil if needed. Open lid and add curry leaf and coriander leaf. Fry for an additional 5 minutes on high adding oil if needed. Serve with steamed rice, Indian fried rice, or any type of roti.

Frys are commonly eaten with rasam in South India with white rice followed by curd.

You can add nuts to the fry like cashews or peanuts in middle of cook time to add more crunch.

Sorry so dark as my Indian kitchen has very little light!

Enjoy!


Indian Gooseberry/ Amla Juice

amla juice

Everything you want to know about amla-Indian gooseberry can be found on the following websites:

http://www.allaboutstuff.com/Garden_Tips/Gooseberries.asp

http://www.webmd.com/vitamins-supplements/ingredientmono-784-indian%20gooseberry.aspx?activeingredientid=784&activeingredientname=indian%20gooseberry

ALL AMLA/INDIAN GOOSEBERRY RECIPES USE THE SAME METHOD TO MAKE THE JUICE AS THE FOLLOWING LINK:

RECIPE FOR PURE AMLA/INDIAN GOOSEBERRY JUICE

1 Cup of Amla Juice

4 Strawberries mashed up

1/2 grape fruit juice and pulp

1 TBS of Honey

Mix all together with a squeeze of lemon!

This is full hair power! Will add a beautiful glow to skin!

Mixed Roasted Nut Crumble

ImageI am a big fan of nuts! In this pregnancy my doctor is encouraging more proteins from nuts and cereals. Having such a problem with my digestion (caused by hormones) I have created an easy way to keep the nuts flowing in my diet. This recipe for Mixed Roasted Nut Crumble can be added to anything from cereals to salads! Skies the limit!!

Ingredients:

1/2 Cup of raw nuts your preference. I chose Almonds, Peanuts, Pistachios, Cashews and only 1/4 Cup of Walnuts

In a wok or large pan (prefer not to use a non-stick pan) heat on high until pan is hot. Take a little water and make sure it bounces and once it does let it boil off. Add all the nuts to the pan reduce to medium heat. For 3-4 minutes do not stir the nuts, let them get hot. Gently toss them around and roast them for 5-10 minutes to desired crunchiness. I prefer dark crunchy nuts and roast them for about 10-15 minutes depending on types of nuts used. Remove from heat and cool down for 30 minutes.

In a grinder/blender/mortar-pestle grind all the nuts together. The consistency is not a paste, it is more like a crumble. Put in container and can keep in fridge for up to 4-5 months, in freezer up to 1 year.


Thotakota Fry/ Amaranth Leaves Fry

Image

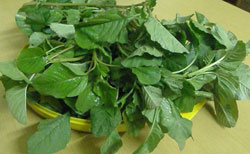
I have enjoyed amaranth since I started eating them in 2011 when my Mother-In-Law brought them back from a trip to her home village in Seesilee, Andhra Pradesh, India. They were fresh and organically grown at her parent’s farm in the middle of the “rice bowl”. So, I usually post photos of my recipes made but I am currently missing my camera’s memory card. The above photo is from Google Images and it is of amaranth leaves. I encourage all who eat this to use a bit more oil than normally would use in leaves to impart the flavor when cooked. You can use amaranth leaves in salads raw as well. This recipe is my Mother-In-Laws and she is a Telugu lady who really enjoys hot food (karaam), but adjusted this recipe for me. I hope you enjoy and make amaranth leaves apart of your weekly diet!

Amaranth is also enjoyed by the Greeks and they have several recipes. I have not tried any, but someday when I get to make some homemade goat cheese and make a Greek amaranth fry, I will certainly post it!

4-5 bushels of amaranth leaves trimmed and chopped

1/2 onion chopped

1 sliced and chopped green chili pepper

1/4 tsp turmeric powder

1 diced tomato

3 Tbs of oil- I prefer Olive Oil or Sesame Oil

4 Curry Leaves

2 garlic cloves pressed and pealed

1/2 Tsp of salt- to taste

In a wok heat oil and add garlic for 25 seconds then onion and green chili pepper and fry for 1 min. Add turmeric, curry leaf and tomato and cook for 3-4 min. Add the amaranth leaves and stir ingredients together slowly, add salt. Cook until the greens are wilted yet a bright green color, about 5-6 minutes. Turn off stove, let sit for 1/2 hour and serve with Chapathi or Pulka.

The good: This food is low in Saturated Fat, and very low in Cholesterol. It is also a good source of Niacin, and a very good source of Protein, Vitamin A, Vitamin C, Riboflavin, Vitamin B6, Folate, Calcium, Iron, Magnesium, Phosphorus, Potassium, Zinc, Copper and Manganese.

Variations of this recipe I have found:

http://homemadetelugurecipes.blogspot.in/2011/02/thotakura-amaranth-leaves-fry.html

Thotakura Vepudu ~ Amaranth leaves stir fry (3)


Awesomely Easy Grape Juice

ImageIt’s that time of year in India where we have tons of grapes available. When I first came here I had no idea of  the variety of crops that Indians grew and to my surprise grapes were in large abundance here! I have every kind of grape I want and my favorite grapes in India, so far, are called Bagalore Blue Grapes. To celebrate my fondness of these grapes I began making grape juice for my daughter instead of buying it. You may or may not need sugar depending on your taste and the sweetness of the grapes when you cook them. Be careful if you use seeded grapes as I do because if you crush the seeds it will make your juice bitter. I choose seeded grapes as they have better mineral and vitamin content than hybrid ones. One interesting fact about grapes is the hazy white coating you see on them is not a pesticide or herbicide but the grape’s own defense against bacterias, bugs and molds. Make sure you wash your grapes well, I always wash my fruits and vegetables with 1/4 cup vinegar to 1 liter of water, then rinse.

The Recipe: Serves approx. 8 glasses of grape juice

2 Kgs of Seed Bangalore Blue Grapes or Concord Grapes—any blue/black/purple grape with seeds. (approx 4 1/2lbs)

2 Cups of Water

2 Large pots

1 Fine Sieve/Cheesecloth

Instructions:

After removing and cleaning all the grapes from the stems place into a plastic Ziploc or plastic cover and take a rolling pin and gently mash the grapes without crushing seeds. Put the crushed grapes into a large pot and simmer on med for 10-15 minutes slowly adding water and stirring and mushing grapes occasionally not letting the grapes stick to bottom of pan or crushing seeds. Once cooked, take sieve or cheesecloth and put over another large pot and ladle the grape mixture into the sieve/cheesecloth and gently crush the mixture and extract the juices- Please remember that cheesecloth will soak up some of your juice so I prefer to use a fine sieve. Cover and let sit for 1-2 hours. Discard or use the grape pomace in anyway you choose and refrigerate up to 1 week or freeze in portions up to 5 months. It can be watered down because it is very concentrated or you can add to carbonated water etc. Only add sugar if you think it needs it. There will be some sediment at the bottom, but I usually stir it up as it adds more nutrition to your drink! Enjoy!

Homemade Raw Cashew & Honey Coconut Milk Ice Cream Sundae

Image

To make Coconut Milk:

6 Fresh Coconuts Shredded- Personally, hand grated yields the most creamy milk

1 liter of Distilled Water

2 Large Mixing Bowl

1 Heavy Object to “press” the Coconut Milk out

Cheesecloth (Do not use a Nut Milk Bag for Coconut Milk)

In Large mixing bowl the coconut shredded and add 500ml water. Press and mix the water into the coconut and squeeze over and over producing a white milk and adding water as you go, remaining 500ml. Let sit for 2-3 hours.I use a smooth Geode bookend to press and mix the coconut milk out. Transfer into a cheese cloth over another mixing bowl and squeeze the milk out of the coconut.Do this with all the shredded coconut and then store in a Zip Lock for a second pressing. Should press remaining coconut within 2 days. Reuse coconut in many different ways, dry at low temp in oven.

Making The Coconut Ice Cream

1 Liter of Fresh Coconut Milk

1/2 Cup of Caster Sugar or Sweetener of Choice and amount varies to taste

1/2 soaked Tahitian Vanilla Bean scraped

1/2 Cup of Coarse Sea Salt

4 Cups of Cubbed Ice

4 Ziplock Bag large

1 Metal Canister with lid

Add Sugar, Vanilla and Coconut Milk mix well. Divide the mixture into the 4 ziplock bags and close. In metal canister add ice and salt and shake with lid to mix together a few times. Take each ziplock bag and put into canister with salty-ice mixture and open bag and stir to get it to freeze up. Each bag can take up to 4-5 minutes. Once turned into ice cream store short term in fridge while getting sundae ready!

Assembling the Sundae

Take local honey and coat bottom of dish. Add 1 Bag Ice Cream to bowl. Dribble honey ontop. Crack raw cashews in hand and sprinkle. Two Pinches of Caster Sugar on top for crunch! Enjoy!!